|
The Turtleizer component allows you to move a small green turtle over a drawing canvas and let it draw something. On execution start, the background is white, the default pen colour is black, the pen is down and the turtle is visible and placed in the centre of the Turtleizer canvas (which has a default size of about 500 x 500 pixels).
API
You can use the following instructions (note that the type specifiers int and double only declare what number type the arguments are expected in or coerced to, the type specifiers are not to be inserted into the instructions, of course):
|
forward(double nPixels)
fd(int nPixels)
|
Make the turtle move nPixels pixels forward, drawing a line segment if pen is down. (fd is a low-precision version of forward, see notes below.)
|
|
backward(double nPixels)
bk(int nPixels)
|
Make the turtle move nPixels pixels backward, drawing a line segment if pen is down. (bk is a low-precision version of backward, see notes below.) |
|
right(double angle)
rr(double angle)
|
Rotates the turtle to the right by some angle (in degrees!).
|
|
left(double angle)
rl(double angle)
|
Rotates the turtle to the left by some angle (in degrees!).
|
|
gotoXY(int X, int Y)
gotoX(int X)
gotoY(int Y)
|
Sets the turtle to the position (X,Y).
Sets the X coordinate of the turtle's position to a new value.
Sets the Y coordinate of the turtle's position to a new value.
|
|
penUp()
|
The turtle lifts the pen up, so when moving no line will be drawn.
|
|
penDown()
|
The turtle sets the pen down, so a line is being drawn when moving.
|
hideTurtle()
|
Hides the turtle. |
| showTurtle() |
Show the turtle again. |
| setPenColor(int red, int green, int blue) |
Set the default pen colour to the given RGB value (range 0...255 per argument). This colour is used by undyed move commands. |
| setBackground(int red, int green, int blue) |
Set the background colour to the given RGB value (range 0...255 per argument). |
| clear() |
Wipe the canvas from all traces of the turtle (without changing its remaining status; versions > 3.28-06 only). |
Three functions are available to retrieve the current position and orientation of the turtle (since release 3.27):
|
double getX()
|
Returns the current horizontal position (may be between pixels).
|
|
double getY()
|
Returns the current vertical position (may be between pixels).
|
|
double getOrientation()
|
Returns the current turtle orientiation in degrees (in degrees, range -180...180).
|
Since version 3.27-05 you have the opportunity to address the Turtleizer routines under individually configurable alias names. You may specify and activate your favourite aliases via menu Preferences › Controller Aliases ....
Please note that:
- Procedures fd and bk are not exact synonyms for forward and backward, respectively, but snap to an integral pixel model, which seems sound at first glance but is less precise than the internal floating-point coordinate model addressed by forward and backward, and even somewhat inconsistent. Remember that e.g. a walk to the next neighbouring pixel in diagonal direction hasn't a length of 1 pixel but √2. Hence, going a way of integral length in an awkward angle is not supposed to end at an exact pixel position. Whereas forward and backward will preserve the resulting floating-point coordinate, using fd and bk coerces the Turtle position to the closed integral pixel position. Only axis-parallel moves will definitely have exact integral length. With consecutive traversal moves, coercion differences < 1 pixel may sum up to enormous deviations on complex drawings, particularly with a large share of short moves. With a floating-point coordinate model, in contrast, the virtual position is not necessarily at an exact pixel position but consistent to the previous moving directions and lengths, which is important for the moves to come. Having both models available in Turtleizer, you may study the differences. (Via the menu items Edit ›
 To fine graphics and Edit › To fine graphics and Edit ›  To integer graphics you may convert selected parts of your diagram code from the one paradigm to the other and vice versa.) Be always aware that any call of fd, bk, or one of the goto* procedures will coerce the respective target position to an integral pixel coordinate, also as starting point for subsequent floating-point moves. To integer graphics you may convert selected parts of your diagram code from the one paradigm to the other and vice versa.) Be always aware that any call of fd, bk, or one of the goto* procedures will coerce the respective target position to an integral pixel coordinate, also as starting point for subsequent floating-point moves.
- The default pen colour for forward/backward/fd/bk commands is black. If you want the turtle to draw a coloured line segment, just colourise the respective element inside the diagram. Alternatively, you may set the default pen colour to a different RGB value, using setPenColor(r, g, b). All forward/backward/fd/bk commands in undyed (i.e. white) diagram elements will then use the most recently set default colour, whereas the instructions of this kind in colourised elements will still draw segments in their respective element colour. Hint: In oder to draw a white line (e.g. on a dark background) you cannot simply use a white (undyed) instruction element, but it will work to set the default pen colour as follows before: setPenColor(255,255,255).
- Negative values for pixel numbers and angles are allowed and will be equivalent to the corresponding positive value in the inverse procedure call, i.e. right(-angle) = left(angle) , forward(-nPixels) = backward(nPixels), and vice versa.
Negative argument values in setPenColour or setBackground will simply be replaced by their absolute amount.
- Omitted arguments are interpreted as 0.
- The calls of the built-in procedures listed above must not be placed in Call elements but ordinary Instruction elements.
- The goto procedures (gotoX, gotoY, gotoXY) will never draw anything — no matter whether pen is up or down. Don't forget that the coordinate origin of drawing canvases is the upper left corner and Y coordinates grow downwards.
- The background colour imposed by procedure setBackground will last till the next setBackground call, though starting a new diagram via the debugger resets the background colour to the default white.
- The angle returned by getOrientation() is 0 if the turtle looks upwards (north), it is positive while the turtle looks to the right (clockwise) and negative while the turtle is turned left (counter-clockwise).
In order to execute an algorithm containing some of the Turtleizer procedures listed above you must have pressed the button  to open the Turtleizer window first. This will automatically open the Executor Control panel as well. While the Turtleizer window is open it will then be sufficient just to invoke the Executor Control panel via button to open the Turtleizer window first. This will automatically open the Executor Control panel as well. While the Turtleizer window is open it will then be sufficient just to invoke the Executor Control panel via button  for another start. Without the Turtleizer window having been opened, the Turtleizer procedures won't be recognised and will cause errors on execution attempt. for another start. Without the Turtleizer window having been opened, the Turtleizer procedures won't be recognised and will cause errors on execution attempt.
Whenever the Turtleizer window is (re-)opened, i.e. the  button gets pressed again, the canvas will be wiped and a new turtle home position will be set in the centre of the window (whatever its previous dimension was). Since the zoom factor is not reset by reopening, the new home coordinates will consider the zoom factor. This home position will persist as start coordinate for any subsequent turtle diagram execution during the session unless you close/reopen the Turtleizer window. button gets pressed again, the canvas will be wiped and a new turtle home position will be set in the centre of the window (whatever its previous dimension was). Since the zoom factor is not reset by reopening, the new home coordinates will consider the zoom factor. This home position will persist as start coordinate for any subsequent turtle diagram execution during the session unless you close/reopen the Turtleizer window.
If the Turtleizer window is closed after having been open before, Turtleizer procedures will not cause errors but the drawing will be done in vain, because the Turtleizer window will not automatically open and on reopening it, the content will be wiped.
The turtle can walk through negative coordinate ranges (.i.e., above the upper border or left of the left border) but its wake will not be visible there (neither will the turtle itself unless it returns to the positive quadrant), though from version 3.30-12 on you have the opportunity to move the drawing result into the visible quadrant via the Turtleizer GUI (see Context menu — displacement handling).
Example
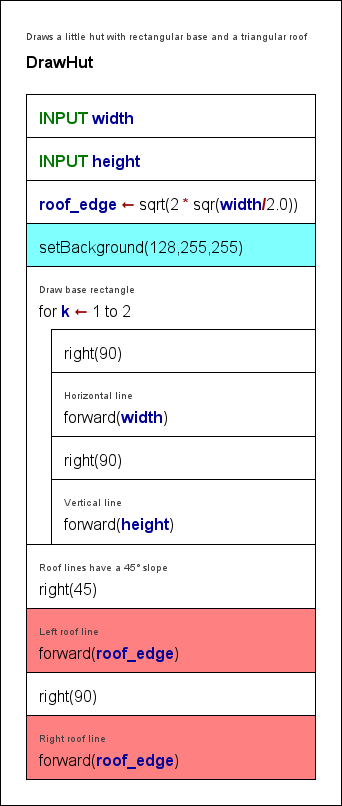
The following algorithm draws a little hut with base hight and width from input with a triangular roof (having a right angle at top):
The drawn image with width = 200 and height = 100:
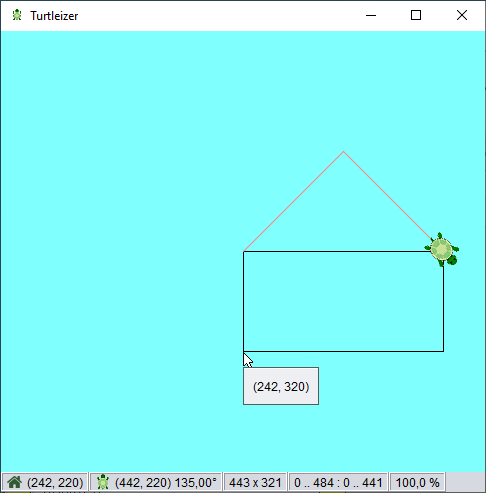
Note that the instruction "setBackground(128,255,255)", which is responsible for the cyan canvas colour, achieves this via the RGB arguments 128, 255, 255 only, the element colour has no effect here and was merely applied for illustration purposes. The red colour of the roof lines, however, is due to the dye of the last two "forward" elements.
Diagram code change helper ( , , ) )
If you want to study the consequences of the pixel coercions with an integral coordinate model in comparison to the floating-point coordinate model or if you happened to use the brief command names in earlier diagrams but want to change to the floating-point model, then the two menu items  and and  in the Structorizer "Edit" menu will help you: in the Structorizer "Edit" menu will help you:
 To fine graphics replaces all occurrences of the Turtleizer procedures fd and bk within the selected element range by forward and backward, respectively; To fine graphics replaces all occurrences of the Turtleizer procedures fd and bk within the selected element range by forward and backward, respectively;
 To integer graphics does it the other way round (i.e. replaces forward with fd and backward with bk). To integer graphics does it the other way round (i.e. replaces forward with fd and backward with bk).
If you have selected a structured element, say a loop, then all directly and indirectly contained instructions are involved, but not so instructions in called subroutines. In order to convert all instructions of the entire diagram at once, simply select the framing program or routine element. These instruction replacements are fully undoable and redoable.
A preliminary check whether the selection contains any relevant Turtleizer instructions at all is done to prevent you from inducing void undo or redo entries. After the conversion, a message box will pop up, telling you how many replacements were done.
Turtleizer GUI (versions ≥ 3.30-12)
Since version 3.30-12, the Turtleizer window offers several useful interactive features:
- Scrollbars allow to scroll over the entire drawing.
- A status bar (by default enabled) shows current information at the bottom.
- A context menu offers navigation, zooming, displacement, view settings, and export.
- Key bindings also allow to zoom, scroll, export, or tune the appearance.
- A popup shows the turtle world coordinates under the mouse position (versions ≥ 3.30-13).
- On dragging the mouse, you can measure the dragged line (versions ≥ 3.30-13).
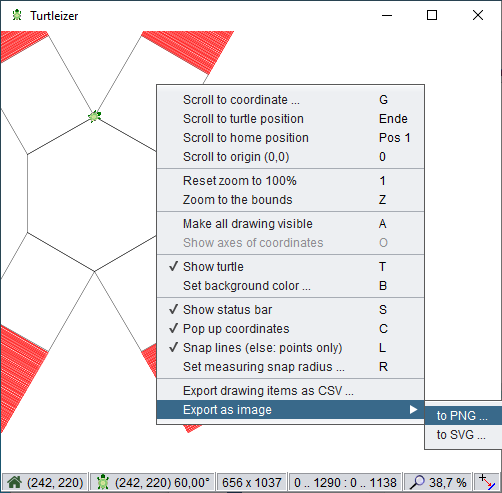
Status bar
The status bar (see screenshot above) presents the following information, from left to right:
- Home position of the turtle (pixel coordinates);
- Current turtle position and orientation (pixel coordinates and angle from North clockwise in degrees);
- Extent of the reachable part of the drawing (width x height) in pixels, i.e. hidden parts of the drawing in negative coordinate areas are not included;
- Current coordinate ranges (xmin..xmax : ymin..ymax) of the scrolling viewport;
- Zoom factor (in percent);
- Snap mode indicator for measuring function:
 for snapping to lines, for snapping to lines,  for snapping to points (see measuring). for snapping to points (see measuring).
Tooltips help to describe the respective contents.
Context menu — navigation
Via the context menu, you can go (i.e. set the croll view) to the following locations:
- a user-specified coordinate (to be entered via a popping-up coordinate dialog);
- the current turtle position;
- the turtle home position
- before a drawing algorithm has been executed, current turtle position and home position will be identical,
- after having moved a displaced drawing into the visible coordinate range, this function will show you the relative home location (with respect to the drawing);
- the coordinate origin, i.e. turtle world position (0, 0).
Turtleizer will centre the view around the specified position unless the target position is too close to one of the canvas margins. It is not possible to navigate to negative coordinate positions or to positions beyond the drawing extensions in positive coordinate direction.
Context menu — zooming support
It is possible to zoom in and out via the <+> and <-> keys of the number pad or by rolling the mouse wheel while keeping the <Ctrl> key held down as usual.
In addition, via the contex menu you may:
- reset the zoom factor to 100 % or
- zoom to the actually presentable part of the turtle drawing (i.e. the parts in the positive coordinate range); this will fit the drawing into the current viewport.
Be aware that the zoom factor will not be reset by starting a diagram execution.
Context menu — displacement handling
Your drawing did not quite fit into the positive quadrant, i.e. some line segments got placed beyond the left or upper border? Don't worry: Turtleizer now allows you automatically to readjust the whole picture into the canvas area afterwards:
- Menu item "Make all drawing visible" (or key <A>) will enlarge the canvas to enclose the entire drawing, i.e. also all line segments drawn in negative coordinate ranges. (Note that this adjustment is not undoable. But the next drawing will again find a mere positive coordinate range.)
- After having extended the canvas around your picture this way, you may display a dashed lightred axes cross in order to mark the coordinate origin (0, 0). Use toggle menu item "Show axes of coordinates" or key <O> for it:
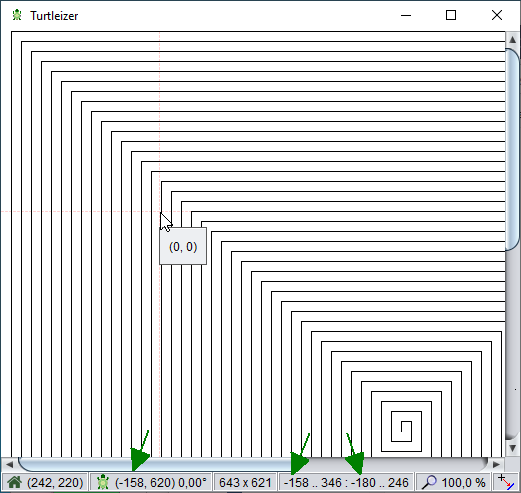
(In the above figure, the cursor indicates the axes crossing. Also note the negative coordinates in the status bar, being marked by the arrows.)
If the drawing does not have any parts outside the positive canvas range then these menu items will simply be disabled.
Context menu — view and measuring settings
The context menu allows you to:
- toggle the turtle visibility (alternatively to the hideTurtle() / showTurtle() calls in the executed diagram);
- specify the background colour of the Turtleizer canvas (alternatively to the setBackgoundColor() calls in the executed diagram) — this menu item will pop up a colour chooser dialog as shown in section Preferences › Colors;
- toggle the status bar visibility (by default the status bar is enabled);
- switch on or off the tooltip popup that shows the canvas coordinate at the current mouse position (versions ≥ 3.30-13, by default enabled);
- switch the measuring mode among snapping to nearest line (status bar icon
 ) or snapping to nearest points only (status bar icon ) or snapping to nearest points only (status bar icon  ); );
- specify the snap radius for the measuring function in a range from 5 pixels (the default) to 100 pixels:
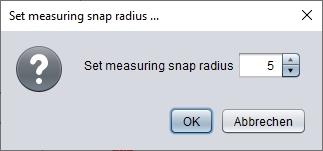
Note that starting a diagram execution will always reset the canvas to white background colour, but will neither affect the turtle visibility nor the status bar visibility, the snap settings etc.
Context menu — content export
Apart from simply saving a screenshot, the drawing content may now directly be exported in several ways:
- as CSV (comma-separated values) file;
- as PNG image file;
- as SVG vector graphics file.
Be aware that CSV and SVG files will always cover the entire drawing, no matter if parts of it are out of reach for the Turtleizer canvas (because of being drawn in negative coordinate areas), whereas PNG export will contain exactly the part of the drawing that is present on the Turtleizer canvas (even including the turtle symbol and the axes of coordinates if they were visible during export).
An export to a CSV file will cover all line segments drawn by the turtle in CSV ("comma-separated values") format — one row per line segment. The first two columns ("xFrom", "yFrom") reflect the start coordinate of the line, the next two columns ("xTo", "yTo") convey the end point coordinates, the ffth column contains a hexadecimally coded alpha-RGB value. (The file will contain only visible line segments, no invisible moves.) The resulting file may be imported by a spreadsheet application like LibreOffice Calc or MS Excel (to name a few):
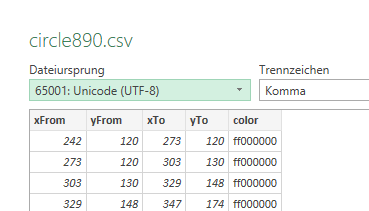
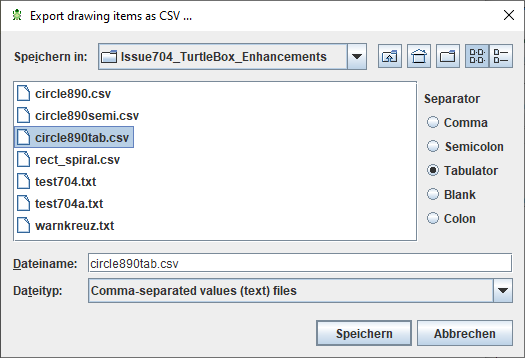
The file selection dialog allows you to choose your favourite column separator (since version 3.30-13):
An export to PNG format will just save a copy of the Turtleizer canvas content as image file in original size (zoom factor being ignored). The clipped parts to the left and top of the upper left corner of the Turtleizer window will also be cut off in the PNG file. But you can of course do the "Make all drawing visible" step before — this will guarantee that the entire drawing be exported to the image file. On the other hand, the turtle itself will be part of the image if it is being shown in Turtleizer (you may hide it via the context menu or key <T>).
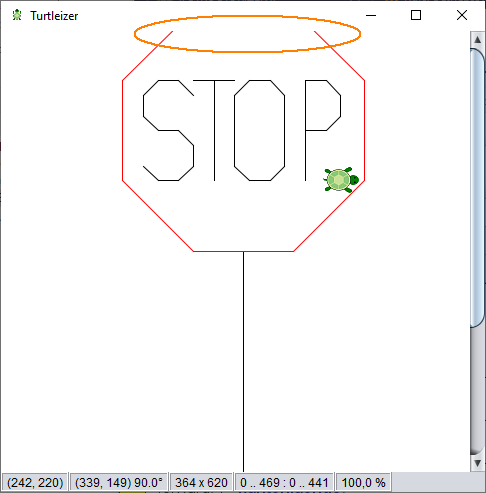
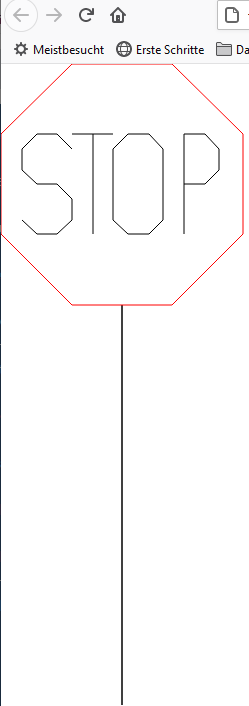
For SVG export, a coordinate offset will be applied that transforms the entire drawing into positive coordinate regions (even if you did not adjust the displacement as explained above), such that no parts will be missing (as for example the clipped top in the left screenshot, see elliptic orange mark). On the other hand, the size of the image will just equal the bounds of the drawing without space around it:
 ==> ==> 
You may impose an integral scaling factor for the export (the zoom factor of the Turtleizer window is ignored here). Therefore a scale factor spinner is integrated into the file selection dialog, by default showing factor 1 (since version 3.30-13):
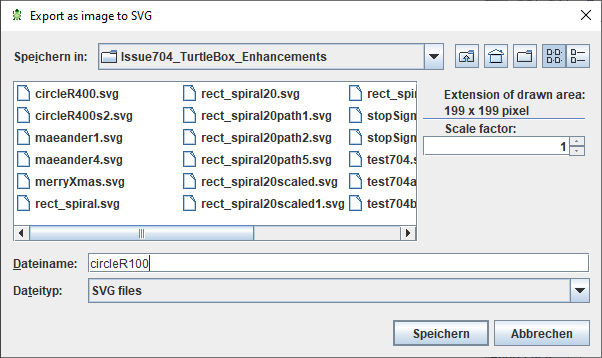
To specify a scale factor > 1 may make sense for very dense line patterns, which might visually degrade in original size after export. As SVG is a vector graphics format, the upscaling won't alter much but enlarges the default display size such that the resulting image may look better e.g. if directly presented in a browser. Look at the following case of a fret pattern drawn with a space of 1 pixel between lines (= line distance 2):

The SVG graphics exported with scale 1 looks bad in a browser:

The same turtle drawing exported as SVG graphics with scale 4 shows the precise pattern when displayed:

(The result of zooming the first SVG file display with factor 4 in the respective viewer will of course look identically, i.e., the default scale factor 1 does not induce an actual loss but may require scaling in the target context to achieve a satisfying effect.)
Measuring
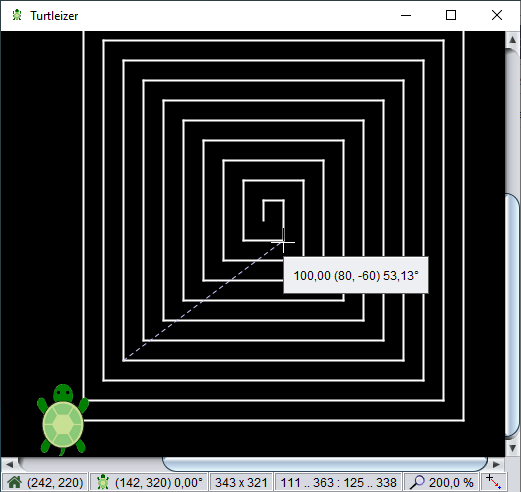
While you drag the mouse (with left mouse button pressed), the cursor will change to a cross hair shape (shown in the screenshot above), a dashed light-blue measuring line will be drawn, and a popup will present:
- the length of the line (in pixels),
- the pair of coordinate delta values (i.e. delta X, delta Y) in parentheses, and
- the orientation of the line (in degrees, clockwise from North, like the turtle orientation would be returned with getOrientation()).
The measuring line will automatically snap in to the nearest drawn lines (or start/end points only, depending on the current configuration) within the configured radius (5 pixels by default). The status bar indicates, which snapping mode is currently active (  or or  ). You my alter the snap mode via key <L> or the respective menu item in the context menu. ). You my alter the snap mode via key <L> or the respective menu item in the context menu.
If you keep the <Shift> button down while dragging then the measuring line will be coerced to strictly horizontal or vertical direction.
Turtleizer help
By pressing the <F1> key you will be shown this User Guide page in the browser. Using <Alt><F1>, the Turtleizer accelerator key bindings will be shown instead.
Aspects of code export
In exported code, the Turtleizer API will usually not work, of course, since the procedures and functions aren't native code in most target languages. Python, in contrast, contains a compatible module "turtle" (some necessary name conversions preserved), which is being addressed by the Python generator of Structorizer since version 3.28-10. For Java and C++ there are exactly compatible source packages available. See Export Source Code for details and links.
For other target languages you may happen to find some adaptable Turtle application or library in the wideness of the internet and manage to integrate it with your exported code. (Please let us know if you come across an easy-to-use compatible FOSS turtle module for some of the supported export languages.)
|

