Classification
An element of the type "Instruction" is the fundamental algorithmic element and may contain any command or simple statement.
Practically, there are five basic kinds of instructions (since version 3.26-02, mere variable declarations are also tolerated, release 3.27 additionally introduced the concepts of constant definitions and type definitions, see below):
- Input: An input instruction reads a text entered by the user and converts it to the value of a specified variable. An input instruction must begin with the input keyword defined in the Parser Preferences, which should be followed by one or (since version 3.29-03) more variable designators (e.g. identifiers, qualified names, or indexed array variables), e.g.:
INPUT value
INPUT length, width, height
INPUT date.day
INPUT readings[i]
If the input instruction comprises several variables then they are to be separated with commas. The targets of an input instruction will be registered as new variables if not already introduced before.
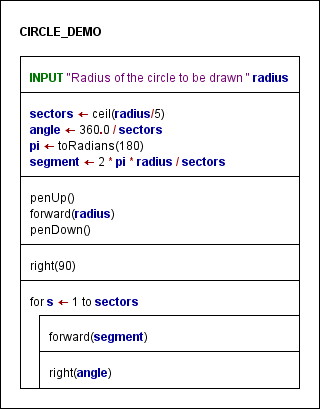
In order to provide the input with a non-generic prompt message you may place a string literal between the input keyword and the first variable (see diagram CIRCLE_DEMO further below, prompt string and variable may or may not be separated by a comma):
INPUT "Please enter your name ", name
An input instruction without variable is allowed (and will just wait for the user to press the <Enter> key as confirmation).
- Output: An output instruction prints something out to the user. An output instruction must begin with the output keyword as configured in the Parser Preferences. After the output keyword, a single expression or a comma-separated list of expressions is expected, e.g.:
OUTPUT "The result is ", value+9, "."
The expressions are evaluated and the text representations of their values will be written into a common output line in their order of occurrence. (Depending on the output mode setting in the Executor Control, the line might either occur in the Output Console Window or in a separate message box.) The next output instruction will not continue the same line but start a new line.
An output instruction without an expression is allowed and will produce an empty output line (or pop up a message box with the hint "(empty line)").
- Assignment: This is when a variable (naming a storage location) or some substructure of it is filled with a (new) value without user interaction. As a general rule, an assignment starts with a variable designator (usually an identifier, but might also be a valid access path with indices and/or component names), followed by an assignment symbol, and ends with an expression, the computed value of which is to be stored in the variable. Accepted assignment symbols are "<-" or ":=". (The first of them will be shown as a left arrow when drawing the diagram, see images below.)
Examples:
value <- 17
length := 9.3E4
date.day := 31
line[i] <- "This is just some string."
The very first assignment to a (new) variable is called an initialisation. Structorizer will not register a variable before it has been initialised (or targeted by an input instruction).
An initialisation may be combined with a declaration (i.e. an explicit type association), where you may choose among different syntactic styles (Pascal, Basic, C, Java):
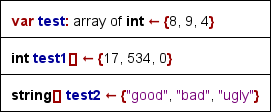
Note that such a "typed initialisation" (which is an effective instruction) is different from a mere declaration. The associated type will usually not be forced, i.e., you may override (or thwart) it by subsequent assignments.
- Internal procedure call (like e.g. forward(100) to move the turtle within the Turtleizer window, further procedures see Syntax). To call a procedure not being built in but referencing another diagram, however, it is suggested to use a CALL element rather than an ordinary Instruction element.
- A terminal return instruction used for the unconditioned delivery of a function result. "Terminal" means that it must be the very last and unconditional element (exit point) of the algorithm, i.e., it must occupy the entire bottom width of the diagram. The diagram must be of subroutine type (see Program/Sub and Settings). In any other case, a return statement must be placed in an EXIT (Jump) element (or be avoided altogether).
- Auxiliary stuff like declarations (of variables) and definitions (of types or constants) should preferrably be gathered at the very beginning of a diagram.
For a list of built-in operators, functions, and procedures usable within instructions (and other elements) see Syntax.
Example of an instruction sequence consisting of an input instruction, an assignment, and an output instruction (in two different display modes, with French keywords):
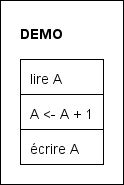 
Standard diagram versus highlighted diagram
Example
Let us consider a somewhat more meaningful example now. Imagine you want to convert temperatures given in Fahrenheit to centrigrades. You know the formula as
ϑC = (ϑF - 32) · 5 / 9.
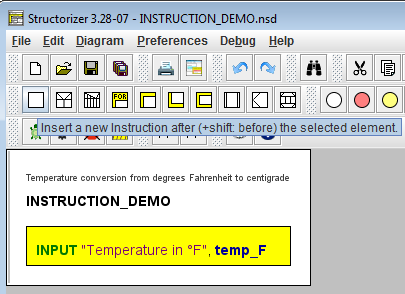
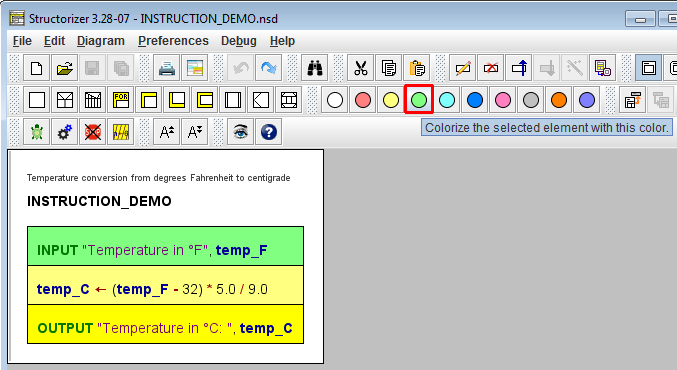
You will need an input instruction to ask for the temperature value in Fahrenheit before you can apply the calculation, and you may want to output the result afterwards. So the algorithm is a sequence of three instructions forming a main diagram according to the classical IPO model (input and output instructions inked green, the assignment instruction tinged yellow):
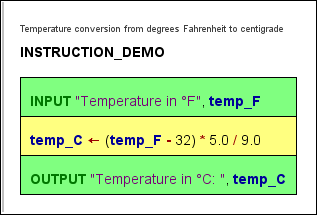
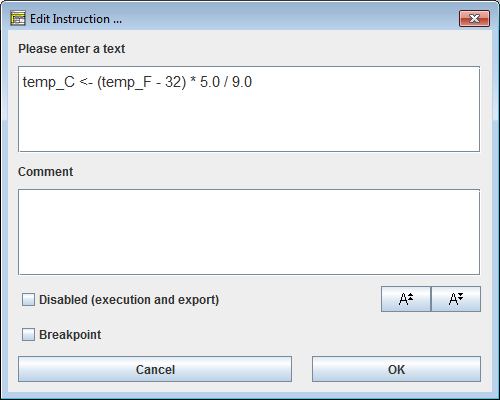
The input instruction implicitly introduces variable temp_F. Variable names in programming languages may usually not contain greek letters or subscripts, so we had to rename it. The yellow assignment instruction introduces the variable temp_C. As you see, the assignment contains the formula nearly as above with some inconspicuous but important differences, though: A variable means a named storage place that has to be filled with a value, therefore we need an assignment operator (the left arrow or ":=") rather than an equality sign to transfer the result of the computation into variable temp_C. The multiplication is expressed by an asterisk. For the division, we better make sure the numbers be interpreted as real (floating-point) numbers lest the result should be that of an integer division (which would eliminate fractions!); therefore they are better written with decimal points.
How to build this diagram, now?
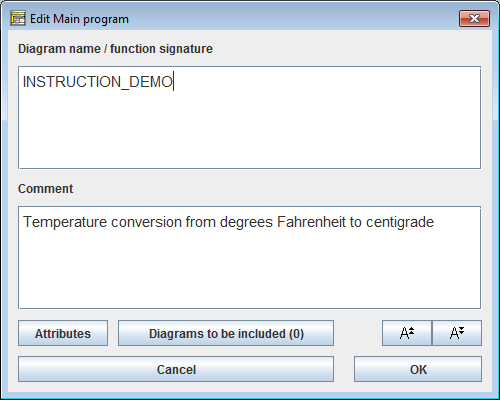
1. Start with an empty diagram, double-click its border and enter the name and a description, then commit by pressing the "OK" button:
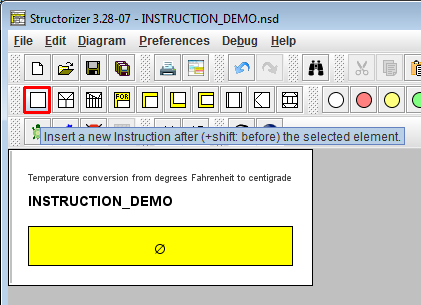
2. Now select the (empty) diagram centre and double-click it or press the <F5> key or the instruction icon (empty rectangle) in the toolbar:
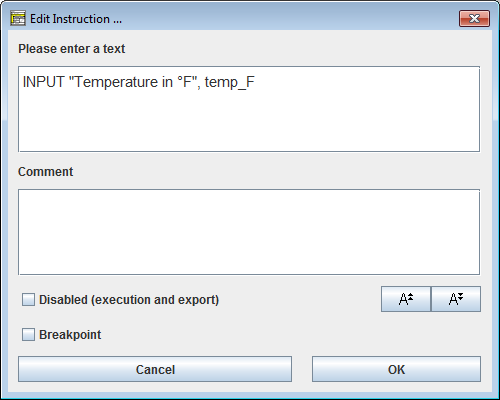
3. When the element editor opens, fill in the input instruction text — use the input keyword as configured in the parser preferences, optionally add a prompt string (here: "Temperature in °F") and specify the variable name, where we ought to adhere to letters of the English alphabet, underscores, and possibly digits:
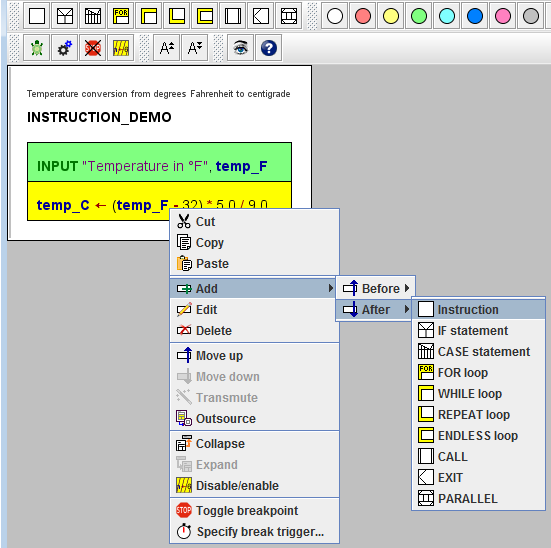
4. The just inserted element will still remain selected, so you may add the next instruction right away (again with <F5>, via the instruction icon, via menu item "Diagram › Add › After › Instruction", or via the respective context menu item, see step 6):
5. Fill in the assignment text (as outlined above, be aware of the assignment symbol between the target variable on the left-hand side and the expression on the right-hand side):
6. Now add the third instruction (e.g. via the context menu):
7. If you like, you may colourize instruction elements in order to emphasize certain aspects (by using one of the round paintbox buttons):
You may download the above Instruction demo diagram here.
Multi-line Instruction Elements
Usually, an Instruction element contains a single statement of one of the kinds listed above. For convenience, however, Structorizer allows an Instruction element to contain more than one statement. In the latter case, use one line per statement (in other words: place one statement per line). But be aware that e.g. breakpoints can only be attached to an entire element, not to a single line. It is not recommended to combine statements of different kind (e.g. input instructions with assignments or output instructions) within a single Instruction element. By the magic wand button  you may merge a sequence of selected Instruction elements into a single Instruction element or, conversely, split a multi-line Instruction element to a sequence of separate Instruction elements consisting of a single statement line each. you may merge a sequence of selected Instruction elements into a single Instruction element or, conversely, split a multi-line Instruction element to a sequence of separate Instruction elements consisting of a single statement line each.
Since release 3.27 you may even spread long instructions over several lines, i.e., continue the statement text in consecutive lines by placing a backslash at the end of each line except the last one — see an example further below in subsection Type Definitions:
If you want to test your diagram via Executor or to export it to source code of a programming language then
- DON'T append instruction separators (like ";" or ":") to the lines;
- DON'T list several commands within a single line;
- DON'T let an Instruction element contain empty lines (obsolete since version 3.30-06).
Variable Declarations
Mere declarations with Pascal or BASIC syntax are tolerated as content of Instruction elements. To be recognised, a mere variable declaration (i.e. without initialisation) must start with one of the keywords var (Pascal) or dim (BASIC). After the keyword at least one variable name (identifier) is expected (or a comma-separated list of identifiers), then a separator — either : (Pascal) or as (BASIC) —, and a type name (identifier) or an array specification. It is not possible to construct an (anonymous) record or enumeration type in a variable declaration. Array specifications must refer to the name of a well-known standard type (like integer or boolean) or a previously explicitly defined type as element type of the array. Examples:
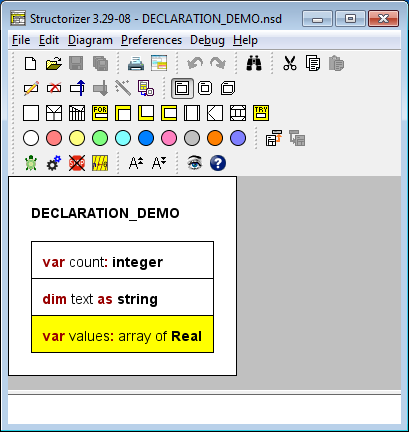
The type association by variable declarations is rather informal and not restricted to a certain programming language. Up to now, most declarations (with one important exception!) in Structorizer do not directly restrict the kind of value you may assign to a declared variable — you can always override the declared type by an assignment of a value of a differing type. But the declaration may influence code export and under certain circumstances be converted into a correct declaration in the target language. The code generators use some type name mappings and try to make sense of different ways to declare arrays.
The mentioned exception from type tolerance are the record types (aka struct types, also introduced with release 3.27). Since components of variables of these types are accessed via component names appended to a record variable name (the variable identifier is followed by a dot and the component name), the knowledge about the user-defined structure of a variable is essential for the parsing of expressions. Therefore type definitions had to be introduced (see below). Variables may not be used as records if they weren't explicitly declared with a previously defined record type (or at least initialised with a respective record initialisation expression), and declared record variables may not simply be abused for other kinds of values.
Note that variable names introduced by mere declarations will not be highlighted unless the variables are initialised somewhere.
Constant Definitions
Instruction elements may also contain constant definitions. Syntactically they look just like variable assignments but with a preceding const keyword. Semantically, constants are indeed handled like immutable variables by Structorizer. This means they can be set only once. The value may be computed by an expression. The Analyser may check whether all involved operands are literals, defined constants, or constant expressions themselves. Further attempts to assign another value to a constant or to alter the defined value will be prevented by the Executor. Structorizer guarantees the constancy in a generous way, though. So you may assign a complex constant object (say an array) to a variable. If you assign an array held by a variable to another variable then both would share the same object. Obviously, to do the same with a complex constant object would compromise constancy or make the target variable implicitly a constant. Rather than raising an error in such a case, Structorizer will just assign a mutable copy of the constant object to the target variable. This goes smoothly but ensures the expected consistency sufficiently.
Examples of constant definitions (also containing some variable declarations):
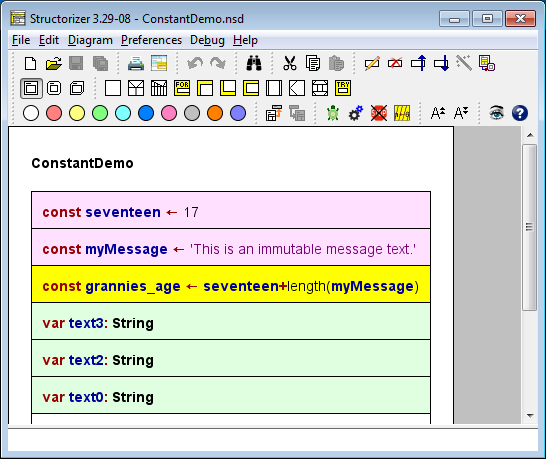
The formal parameters of routines may also be declared constant by placing a preceding const keyword. In this case, the value passed in from the respective argument on calling the routine may not be altered within the function (read-only semantics). Again, with passed-in arrays or records you obtain only an immutable copy, which prevents a compromising impact on the original array or record content.
The left-hand side of a constant definition (i.e. left of the assignment symbol) may also contain a type specification, thus looking like an initialising variable declaration but that the const keyword replaces the var or dim keyword. With the const keyword, even a C-like type specification would be possible (like in variable initialisations). As with variable declarations, type specifications are rather informal (and not restricted to type names of a certain programming language). Moreover, they are redundant here because the type may be derived from the constant expression. But they may yet be helpful on code export. Of course, the type association of a constant cannot be modified since a reassignment is not possible.
Type Definitions
Instruction elements may also contain type definitions. As outlined with the paragraph about variable declarations, they became necessary with the introduction of record/struct types and have been generalised for other kinds of type thereafter.
A type definition starts with the reserved word type, followed by the name of the new type to be defined (an identifier), an equality sign and, at the right-hand side of it, the type specification.
For a compound type, either the reserved word record or — synonymously — struct and an opening curly brace must come next. After the brace, a list of component declarations is expected, which look similar to parameter declarations of a subroutine; Pascal-style (name: type) as well as BASIC-style (name as type), and C-style (type name) component declarations are all accepted but must be separated with semicolon (!). Only in Pascal-style, group declarations are allowed: several component names sharing a common type may be listed with comma separation before the colon (e.g. Date components month, day or Student components name, firstname in the screenshot below). Finally, the declaration list is to be terminated with a closing brace (this syntax is a mixture from Pascal and C):
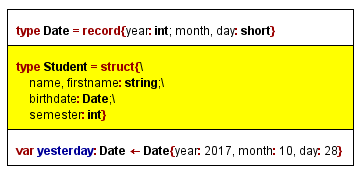
If you want to spread a type definition over several lines, then each line but the last one must end with a backslash.
The last element in the figure above shows a record variable declaration with immediate initialisation — which is highly recommended.
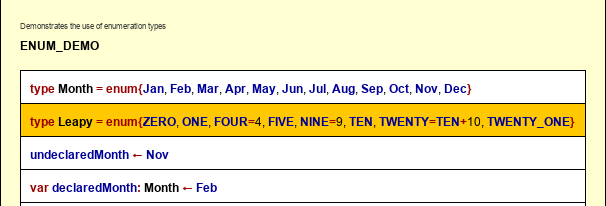
For an enumeration type (versions ≥ 3.30-03), the reserved word enum is expected (instead of struct or record), also followed by an opening curly brace. Between the opening brace and the closing curly brace (which ends the type definition), a comma-separated sequence of enumerator names (unique identifiers) is expected. Each of the enumerator names becomes an integer constant, the numeric value of which is incrementingly assigned by Structorizer, starting with 0. You may specify a different coding by associating an enumerator name with an explicit non-negative integer value via an equality sign (for an example, see second type definition in the screenshot below).
For an array type (as type definition supported since version 3.32-12), there are two ways to specify them on the right-hand side of the equaity sign in a type definition:
- Pascal style: it starts with the reserved word array, possibly followed by one or more index ranges within a common pair of square brackets, followed in turn by the keyword of and the name of the element type (or, recursively, another array specification);
- C-Style: the name of the element type (an identifier), followed by one or more brackets, each containing one or more non-negative integral numbers. The numbers specify how many rows (columns etc.) the array shall have.
Hence, a three-dimensional array type of floating-point numbers with double precision might be specified in any of the follwing ways equivalently:
- array [0..9, 0..14, 0..3] of double
- array [0..9, 0..14] of array [0..3] of double
- array [0..9] of array [0..14] of array [0..3] of double
- double [10, 15, 4]
- double [10] [15, 4]
Note: It is not allowed to define an array type over an anonymous compound or enumeration type construction. If you want to define an array type with e.g. a record type as element type then you must first define the record type (thus giving it a name), then you may refer to it via its name in the array type definition.
Last, but not least, a type definition may just name an alias for another type.
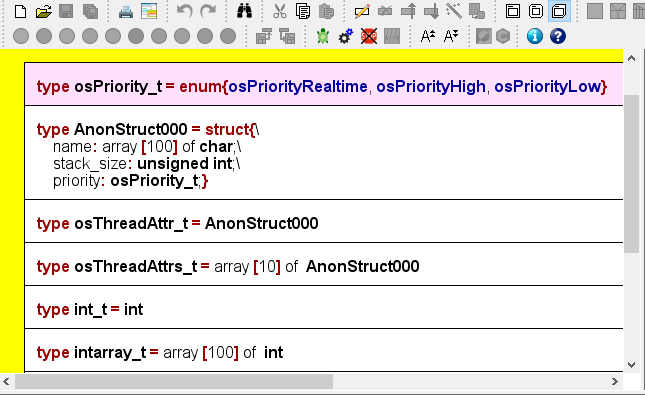
Defined types may also be used as parameter types for subroutines. But be aware that in this case both diagrams (the caller and the called one) must know the type, otherwise the argument passing wouldn't work. To share the type definition, you must place it into an additional diagram of type Includable and put the name of this includable diagram in the include list of both communicating diagrams (you have access to the include list of a diagram via the button "Diagrams to be included" in the Program / Sub editor). |

