What is a CASE statement?
A CASE element (or "selection") represents a multi-way forking of the control flow within an algorithm. The branch to choose is determined by a comparison of the value of the control expression (discriminator) in the element header with the values (selectors) in the branch headings. The number of branches depends on the number of selector lines you write into the text field (see below). A CASE structure may provide a "ragpicker" branch (called default, else, or otherwise branch), which is placed right-most and will catch any discriminator value not matching any explicit selector.
In contrast to an IF statement, the controlling expression (discriminator) is not of Boolean type but typically yields an integral number or a character (in Structorizer it might also evaluate to a string), more generally spoken a distinguishable value out of a set of discrete (usually primitive) values. The selector values are then constants (literals) of that very data type to be checked against the actual value of the discriminator expression.
CASE elements are perfect for enumerator types but do neither make sense for floating-point numbers nor for structured objects, whereas there is simply no benefit over an IF statement for Boolean values, on the other hand. (Even if Structorizer is very tolerant here, if you intend a code export do not forget that many programming languages deny applicability to non-integral types. So better think twice whether you ignore the related Analyser warnings.)
Inserting a new CASE element
In order to add a CASE element select the element it is to precede or to succeed.

Then you may press the toolbar button marked with a red box in the screenshot above, or you might select one of the menue entries "Add › Before › CASE statement" or "Add › After › CASE statement" in either the context menu or the "Diagram" menu. (Or you simply press one of the function keys <F10> or <Shift><F10>, depending on whether the CASE element is to be inserted after or before the currently selected element.) This will open the element editor for a new CASE statement.
Since version 3.30-15, Structorizer offers you a specific editor for CASE statements, which is described further below. We will first explain the traditional editor variant because it elucidates best the structure of the (internal) element text and thus the default text that can be specified in the Structure Preferences. Which of the two editor variants will open depends on a checkbox in the Structure Preferences.
With the traditional general-purpose element editor, you get just a multi-line text area where the controlling information can directly be written and modified (which is of course convenient, particulary for a new CASE element):

The multi-line text to be entered into a CASE form is interpreted like this:
- line 1: the discriminator expression to be evaluated (in the example above: variable A);
- lines 2..(n-1): one or more constant values (to be separated by commas) where the first match (i.e. equality) with the discriminator expression result will lure the execution into the associated (i.e. (i-1)th) branch;
- line n (the last line): the label for the "else" branch. (As outlined above, this is where the execution jumps into, when none of the selector constants from lines 2..(n-1) matches the discriminator result.) The label itself does not matter, unless you name it "%" (without the quotes, of course) — which would suppress the default branch. If you wouldn't place any instruction into the default branch then you can omit it (by writing the "%" into the last line).
On creating a new CASE element, the text area will be pre-filled with the respective text template you may specify in the Structure Preferences. (It must of course have the same structure.)
Remember: If you want a CASE statement without a ragpicker branch (aka "else part"), then the last line must be "%", otherwise a default branch will be provided and the content of the last line will be used as its label (no value check is done against it).
With many branches and/or long selector lines the CASE element might quickly become very broad. If long selector lines are the width-determining factor then you may use line breaking (i.e. split a long line into several ones by placing a backslash at the end of incomplete lines). See the last example in the table below.
Examples:
Content of the
CASE text |
Generated diagram |
A
1
3
5
sinon |
 |
A
1
3
5
% |

|
|
month
1,3,5,7,8,10,12
4,6,9,11
2
default
|

(Supported by Structorizer versions since 3.22-31)
|
|
answer
"yes"
"no"
"sometimes",\
"don't know"
default
|

A selector line is broken via a (later invisible) end-standing
backslash in order to keep the branch width slim.
(Rotation of "atomic" CASE branches can be specified in
the Structure Preferences.)
|
After having filled in the text area of the element editor and committed ("OK" button), the result might look like in the screenshot below. You can now fill the different branches with suited elements from the toolbar:

Download the accomplished Demo.
The drawn CASE structure is composed of
- the head (comprising the triangular shape showing the discriminator expression and the trapezoid shapes containing the branch selectors) and
- the respective branches, which are initially empty sequences (indicated by the ∅ symbols).
In order to insert elements to a branch select the respective branch and insert the elements needed in the usual way (see Diagram/Add element).
In order to append an element after the entire CASE statement select the head of the CASE structure first and then add the element to follow as usual (see Diagram/Add element).
Regarding the control flow, to pass a CASE element means to evaluate the discriminating expression and to execute the branch the selector of which matches the discriminator value. After the branch has been executed, the control flow passes to the next element appended below the entire CASE element — independent of the selected branch. If none of the selectors equals the choice value then without a default branch the control is directly passed to the subsequent element, otherweise the default branch will be executed first. (An empty default branch is redundant.)
Editing an existing CASE element
On editing an existing CASE element (e.g. after double-clicking or pressing the <Enter> key while the CASE head is selected) you may of course insert or remove lines as described above. You should be aware, however, that branches are associated with the lines. In contrast to a new CASE element, these branches will usually not be empty but will already contain instructions or other elements. Using the traditional editor (see above), the branches will not move correspondingly when you e.g. insert new case lines. Instead they will stick to their original position (left-bound) rather than to their originally associated selector list! Regarding the first example of the table above, to insert a new line "2" between "1" and "3" would result in the following situation where the red-coloured branches are now associated to wrong selectors and will have to be moved rightwards by dragging them one by one or by a sequence of manual cut and paste actions in order to restore the original semantics:

Conversely, if you reduce the number of case lines, then the supernumerous branches from right to left will automatically be deleted on commit — no matter which selector lines you removed. Hence, if you had deleted the line "1" in the original example you would end up with the former default branch gone and all three remaining branches being wrongly associated (marked with red colour again):

So take care when editing by means of the general-purpose element editor! If you want to avoid hassle then add new cases preferably near the end of the list (though the default case must always be the last one) and copy the contents of branches prone to vanish before you start to remove obsolete selector lines from the text.
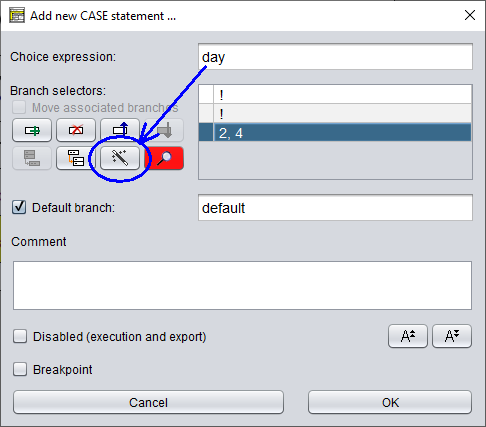
This is now where the new, CASE-specific editor comes in! It is available since version 3.30-15 and was again substantially enhanced with version 3.30-16. It gives you consistent control not only over the selector lines but also over their associated branches:

(The version 3.30-15 editor prototype provided only the first four of the eight icon buttons on the left-hand side.)
As you may see:
- The discriminator expression (i.e. the first line of the CASE text) has an own text field here (labeled "Choice expression:").
- Each selector line of the text is now represented in a table row (in the second column) beneath the descriminator text field (label "Branch selectors:"). The first column of the rows is reserved for branch numbers. It will show the sequential number of the associated branch — if the branch is not empty. An empty branch is represented by an empty cell. (So for a new CASE element, the cells in the first column will always be empty.)
- To the left of the table view you find:
- a checkbox "Move associated branches" (not enabled on creating a new CASE element) and
- eight (in version 3.30-15 only four) function buttons, which are described below.
- The next section below contains
- a checkbox to enable / disable the default branch and
- a text field for the default branch label (only editable when the checkbox is selected).
Broken lines (by means of a backslash at the end of a line, symbolising the logical continuation in the next line, see last example in the above table) are concatenated into a common table row, where the "soft line breaks" (i.e. the backslashes) appear replaced by "\n" substrings between the concatenated line parts (see first table row in the following screenshot). Consequently, if you want to "soft-break" a line, insert the character sequence "\n" at the intended position of the row. (Inside a string or character literal, if being part of a line, however, the newline escape sequence will just denote a newline character, as usual.)

The effect of the first four buttons is straightforward:
 Adds a new selector row at the end of the table and opens the cell editor. New rows will always have an empty cell in the first column (no associated branch). From version 3.30-16 on, however, you may manually associate an orphaned branch (if there is one) to it by clicking into the cell of the first column and choosing the respective branch number. Adds a new selector row at the end of the table and opens the cell editor. New rows will always have an empty cell in the first column (no associated branch). From version 3.30-16 on, however, you may manually associate an orphaned branch (if there is one) to it by clicking into the cell of the first column and choosing the respective branch number.  Deletes the selected rows. Deletes the selected rows. Moves the selected rows one row up. Moves the selected rows one row up. Moves the selected rows one row down. Moves the selected rows one row down.
The other four buttons (introduced with version 3.30-16) need a little more explanation:
 Merges the selected rows into one (using comma as separator between the selector expressions) — will only be enabled if the selected rows are not associated to different non-empty branches (i.e. at most one branch number may occur among the rows, possibly several times, though). Merges the selected rows into one (using comma as separator between the selector expressions) — will only be enabled if the selected rows are not associated to different non-empty branches (i.e. at most one branch number may occur among the rows, possibly several times, though). Splits the selected row into several ones (one for each listed selector expression) — will only be enabled if a single row with more than one comma-separated selectors is selected. If a branch number is associated then it will be copied to all emerging new rows (these rows could be re-merged as they share a common branch number). Splits the selected row into several ones (one for each listed selector expression) — will only be enabled if a single row with more than one comma-separated selectors is selected. If a branch number is associated then it will be copied to all emerging new rows (these rows could be re-merged as they share a common branch number). Enumerator assistant: It will be enabled as soon as the discriminator expression (first text field) is detected to be of an enumerator type and if some of the enumerator values are missing among the selectors. If pressed then rows for all missing enumerator values will be added (by the symbolic name). Moreover, occurring integer codes within the enumerator type range will be replaced by the respective symbolic enumerator names, and superfluous rows (only specifying values not being member of the enumerator type) will be removed — unless they are associated with a non-empty branch (i.e. a branch number). The action includes the unselecting of the default branch checkbox — a default branch is not of course needed if the set of selectors is exhaustive (except perhaps for paranoia). Enumerator assistant: It will be enabled as soon as the discriminator expression (first text field) is detected to be of an enumerator type and if some of the enumerator values are missing among the selectors. If pressed then rows for all missing enumerator values will be added (by the symbolic name). Moreover, occurring integer codes within the enumerator type range will be replaced by the respective symbolic enumerator names, and superfluous rows (only specifying values not being member of the enumerator type) will be removed — unless they are associated with a non-empty branch (i.e. a branch number). The action includes the unselecting of the default branch checkbox — a default branch is not of course needed if the set of selectors is exhaustive (except perhaps for paranoia).
 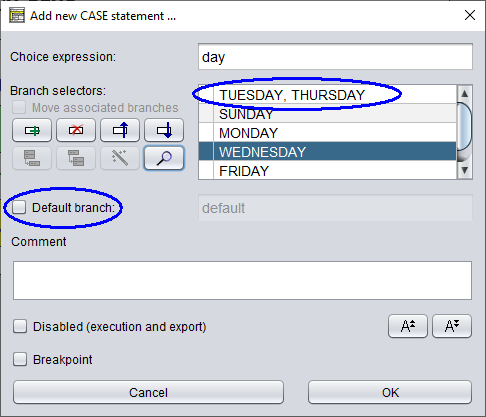
Note that the above example (where the former third row survived as new first row but with the enumerator names instead of the codes) requires the variable day explicitly to be declared with an enumerator type, otherwise the static type inference would not have succeeded:
  Consistency check: Dynamically indicates the analysis status and allows to present a problem report (on pressing the button, content see below). It will change its colour depending on the findings of the automatic synchronous checks: Consistency check: Dynamically indicates the analysis status and allows to present a problem report (on pressing the button, content see below). It will change its colour depending on the findings of the automatic synchronous checks:
- It will turn red if conflicts among selectors are detected (i.e. a selector value occurs twice or more often) or if the discriminator expression is proven to be unsuited i.e. specifying an array or record.
- It will turn orange if non-empty branches get orphaned (bound to be deleted on committing), if some selectors cannot be evaluated (i.e. they do not represent constant expressions), or — in case of an enumerator type — if there are rows containing selectors that are not members of the enumerator type.
- Normal if none of the above problems were found.
The possible consistency problem reports have the following form:
 
- Choice value of structured type
Just the respective message:
A structured choice expression is unsuited!
- Selector conflicts
Each conflict is symbolised by a line starting with the selector expression (character sequence), then a colon as separator, followed by the list of the row numbers of its occurrence (the same row number may be listed several times, if the value happens to repeat even within a line), e.g.:
4: rows 2, 3, 3, 7
- Dubious selectors (not evaluable literals or expressions)
A vertical list of the selectors as are, e.g.:
!
???
sqrt("idiotic")
- Missing enumerator values (and no default)
The names of the missed enumerator constants are shown in a coma-separated line (if the choice expression is not of an enumerator type or the selection has a default branch, this check will not be performed), e.g.:
BLUE, YELLOW
- Redundant rows (unlikely values) in case of an enumerator as discriminator
For each redundant row the row number and the selector line content are listed, both separated by a colon.
17: stan, laurel
- Orphaned branches
A comma-separated list of branch numbers no longer assigned to a row:
2, 5
Some more check examples:
 
The table cells of the first column (branch numbers) are editable under certain circumstances from version 3.30-16 on: In this case you will get a pulldown choice list offering you:
- an empty string — if the cell contains a branch number then you would clear it (thus unbinding the branch);
- the numbers of all currently orphaned branches — thus allowing you to adopt one of them to the selected row;
- the already associated branch number (if any) of this row — to allow you to retain or restore the branch association.
Note:
- All activities to unbind or reassign the branches as described here are only sort of a pre-selection and will only be accomplished on committing the changes via the "OK" button. The status of the checkbox "Move associated branches" would not have an actual effect before committing, either. If it is unchecked on committing then none of the prepared branch reordering will be set into force — instead the result would be the same as if you had worked with the traditional editor (see above). So it is still up to you.
- In version 3.30-15 you had not the opportunity to revive / reassign a branch number once the row was deleted. The first table column was generally not editable. Hence, the related branch was bound to be removed as well, at least if "Move associated branches" was checked on committing. New selector lines added during editing have an empty field in the first column.
- The checkbox "Move associated branches" is not enabled on inserting a new CASE statement — simply because there cannot be branches containing elements, hence there is no need to mind their order.
This editor variant can be enabled (or disabled) in the Structures Preferences dialog.
Hints
- You may decompose a CASE element into an equivalent set of nested IF elements simply by applying the transmutation wand to the element in the diagram (not in the CASE element editor!). You may undo this decomposition but you cannot transmute nested alternatives into a CASE element. (The efforts to check the prerequisites for this conversion would be too expensive.)
- An option in Structure Preferences allows you to specify that atomic or collapsed branches in CASE elements with many branches, i.e. with more branches than the specified threshold, will be rotated in order to reduce width. See examples in the table above and in Structure Preferences.
|