What is it?
The Translator chiefly is a tool to facilitate the maintenance of the application itself but also offers customisation opportunities.
As you probably know, Structorizer GUI is available in different languages. The small developer team alone, however, is only capable of keeping about three translations up-to-date: English, German, and Spanish.
But you may help! Users with a good understanding of the concerned concepts and mastering one (ore more) of the likewise neglected languages are invited to help keep the other localizations consistent and up-to-date. Even small steps improving the translations are welcome. We promise: You will not be held responsible for missing translations or misspellings or whatever. They will simply be corrected the next time. This way, a very appreciated external helper from the Netherlands pushed the Dutch translation forward to near completeness, lately.
To facilitate user's contribution, Structorizer integrates a component called "Translator" in its GUI. It allows easily to edit the different translation sets. The translations can be saved, reloaded and resumed, and last but not least, you may even induce a preview of your current translation in Structorizer, which makes testing a lot more user-friendly than it had been before.
Translator is opened via the menu item "Translator ..." in the "File" menu of Structorizer:

How does it work?
Translator GUI comes with a toolbar and a tabbed table view.
The toolbar consists of language buttons (each showing a flag), a question mark button, a preview button (showing an eye) and a button to save an edited translation to a file.
The table view will initially be empty and show nothing but a message "Please load a language!":

By pressing one of the flag buttons you will select and fetch ("load") an already supported locale. To create a new translation click on the button showing the question mark.
By keeping the <Shift> key down while clicking on a language button you can load a previously saved local translation file instead of the currently installed translation. Since version 3.30-16, the icons of the locale buttons will temporarily change (small folder symbols will appear over the flags) while you hold the shift key down, in order to indicate the altered mode:

Moreover, you get a context menu on each language button (including the "question mark button") offering you the different button-related load/save options in another way:
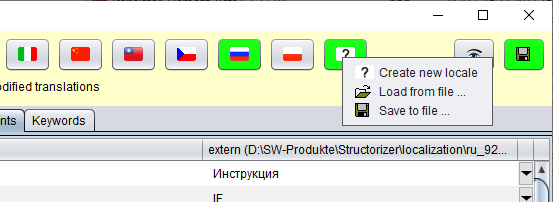
Why isn't there a single load button? Well, could have been, but the idea is to use the locale-specific button, because this allows the comparison of the product locale with your modified file — all differences will be highlighted. For completely new language projects, it does not of course make sense to highlight all differences to a different language. Therefore the "Create new locale" button now also offers the option to load a begun translation file without highlighting all entries. Only the changes with respect to the content when loaded will be tracked, which maes most sense.
At any time you may freely switch to another language to check or compare other translations (e.g. in order to disambiguate or to help your understanding) without losing your changes.
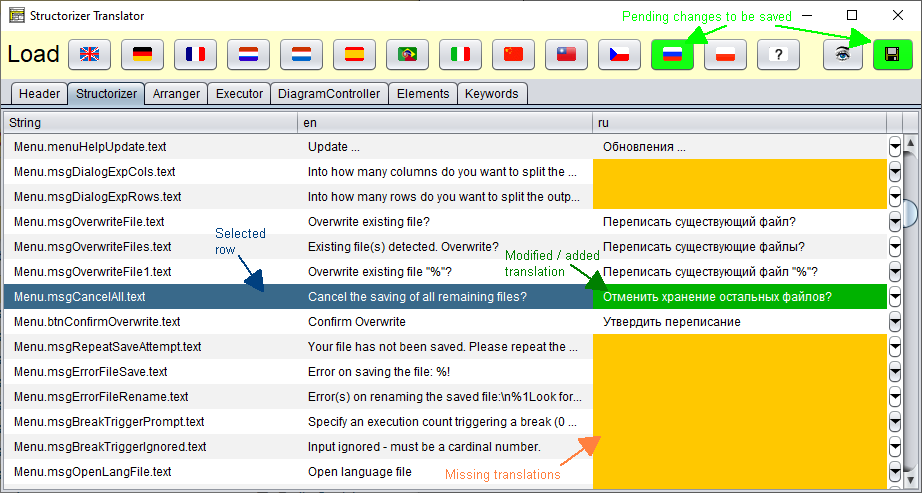
Now you will be presented the translation contents in several chapters selectable by the tabs:
- Header (representing the language file header with explaining comments and change history);
- Structorizer (translations for the core product GUI);
- Arranger (translations for GUI of the Arranger component);
- Executor (translations for the GUI of the Executor component);
- DiagramController (translations for diagram-controllable modules like Turtleizer);
- Elements (optional localization of the element type names, also see Element Names Preferences);
- Keywords (optional localization of Parser Preferences).
Each of the tabs (except the Header tab) shows you a scrollable table of three text columns (plus a fourth column holding pull-down buttons):
- Key string (dot-separated hierarchic sequence of component identifiers or numbers, possibly followed by a bracketed condition);
- English caption or text (as far as available);
- translation in the selected language (as fas as available) — this column is the only editable one.
By double-clicking the cell in the the third column, you may edit its content. In some cases the messages may be very long, such that editing within the table cell may get very cumbersome. The pull-down button in the fourth column (at the end of each editable row, introduced with verson 3.29-11) address this problem: a specific translator row editor will open, offering more comfort. It is described further below.
The Translator highlights what work has already been done (i.e. all differences w.r.t. the locale delivered with the product version) and which translations are still missing.
Highlighting colours:
- Cyan-coloured rows having a string enclosed by "-----[" and "]-----" in the first column represent a section name and cannot be edited. They just group entries belonging together.
- Missing translations in editable rows are highlighted in orange. Note that in certain cases the English translation may also be absent due to missing necessity (e.g. in cases of one-way dialogs or file extension names), as shown in the screenshot above. This does not mean, however, that a localization is not necessary. If you don't have an idea what text it should contain then just contact the developer team, please.
- Translations added or modified w.r.t. the delivered locale are highlighted in green (only in the last column).
- If a translation was deleted (in comparison to the delivered locale) then the respective entry will be hightlighted in red (only in the last column).
On selecting a row, the background colours vary to emphasize the selection:
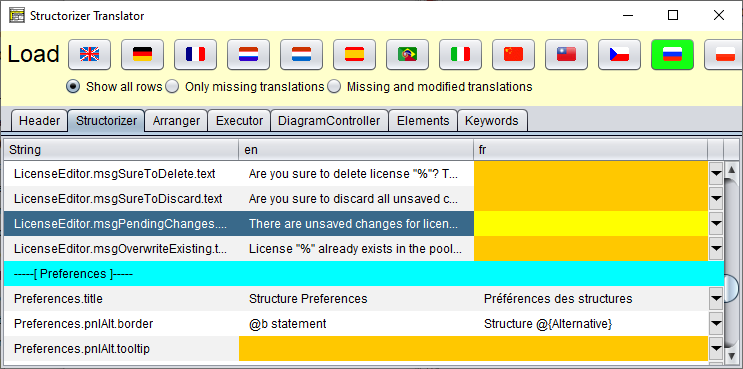
Changes are cached but not automatically saved to file. As soon as a language set contains at least one modification, the respective language button will show green background, therefore, to indicate unsaved changes. So it is easy to stay in control and keep track for what languages there are unsaved changes. (With some look & feels, however, this button colouring may hardly be detectable. You may try with a different look and feel then, controlled by the look & feel preference of Structorizer, "Nimbus" should usually do well.)
Filtering
Since version 3.31-03, you will find a group of three radio buttons for filtering between the locale buttons and the section tabs:
- Show all rows
- Only missing translations
- Missing and modified translations
The radio button group allows you to restrict the presented rows to those that are still empty for the currently selected locale (see screenshot) or the empty ones plus all modified ones. This allows to efficiently accomplish a translation without the need to scroll through large tables on end. Subsection headers will always be visible, though, for better orientation.
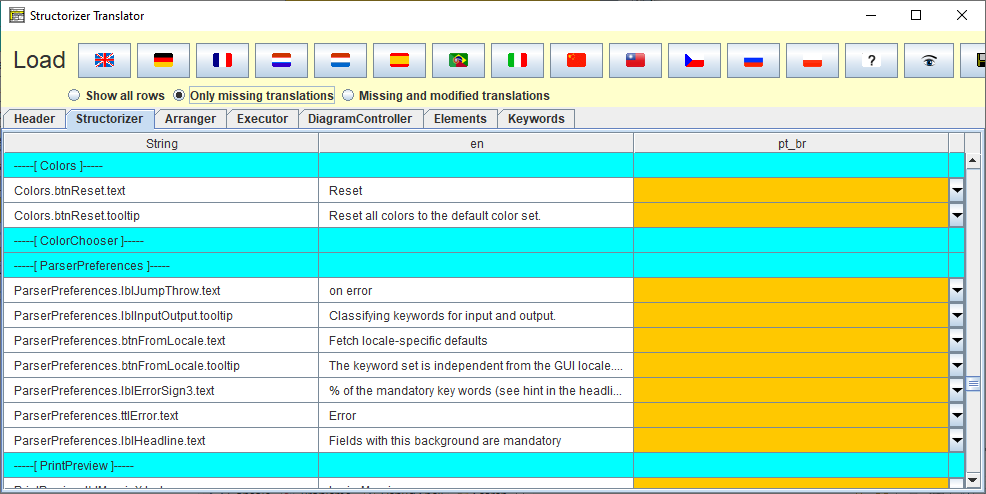
In filtered mode, to fill in a missing translation will not make the row vanish immediately, though. In order to hide the already filled rows switch to another filter option and then back. This induces an update of the filter result.
When you change the locale (i.e., load another locale) then the filter will be reset (→ "Show all rows").
Be aware that an active filter also affects the search scope (see below).
Placeholders
Mind the placeholders in the texts. These are meant to be replaced by variable strings at run time. There are three kinds of place holders:
- Ordinary ones, starting with a percent character: "%", "%1", "%2", etc.;
- Element name place holders, starting with '@' and followed either by a single lower-case letter or an internal element class name, enclosed in braces: "@a", "@b", "@{For}";
- Indexed placeholders "[#]" to be substituted by the current index for array targets.
If place holders of these kinds appear in an English master text then they should also be put at appropriate positions (according to the grammar requirements) into the respective translation texts. Read more about the element name place holders (introduced with version 3.27-04) in section Preferences => Element names. Note that the translator row editor (as introduced with version 3.29-11) allows you a preview of the element name placeholder substitution.
Search
You may search for a certain substring in the currently presented table (since version 3.27-04). The "Find" dialog is opened by pressing key combination <Ctrl><F> (as usual):
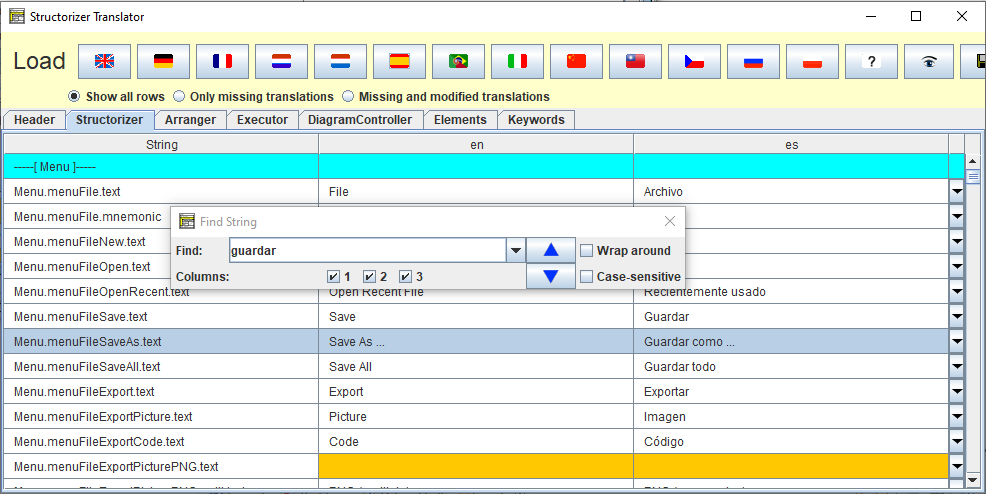
The use of the Find dialog is quite straightforward: Enter the substring you are looking for, select the column numbers (with regard to the currently shown table) you want to restrict your search to, decide whether the search is to respect letter case or not, and press either the upwards or downwards button (the ones showing a blue triangle). Then the previous or next line containing the given substring wil be leaped to and selected. This should help you preserve translation consistency.
Note: If a row filtering is imposed (versions ≥ 3.31-03, see above) then only the visible rows will be searched. Consider switching to "Show all rows" before starting the search if all entries of the current table are to be scanned.
As mentioned above, you may arbitrarily switch to another locale (e.g. for comparison) without losing your changes, simply by pressing the respective language button (or by pressing the <Enter> key while the button has the focus). If you click on the language button of the very locale you are currently working on and there are cached modifactions for this language then you will be asked if you want to discard the changes. If you agree then the original locale will be reloaded. If you decline then nothing will happen (the button action will be cancelled).
On closing the Translator, however, you will be warned if there are unsaved changes for some of the languages. You better save them before or at least now. If you re-open Translator without having closed Structorizer, however, the changes may still be present. Caution: You won't be warned of unsaved Translator changes when you close the owning Structorizer (i.e. the entire application)!
Translation preview
To preview the modifications in the currently running Structorizer, press the "eye" button  in the toolbar (also see images above). The Structorizer GUI will immediately be retranslated with your locale. In Structorizer itself, the language preference menu will indicate this situation as follows (since version 3.30-13): in the toolbar (also see images above). The Structorizer GUI will immediately be retranslated with your locale. In Structorizer itself, the language preference menu will indicate this situation as follows (since version 3.30-13):
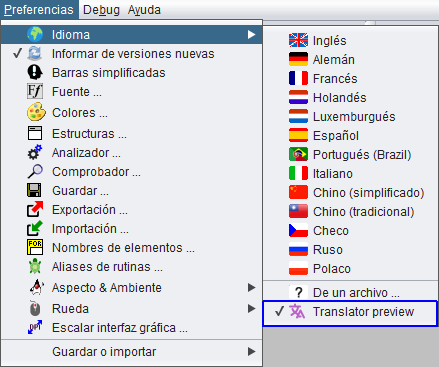
You cannot switch off the preview in Translator itself. Instead you should select a regular locale in the language preference menu of Structorizer shown above. Alternatively, you may switch to another language in Translator and activate the preview button again, which is just a different preview, actually.
How to save translations
In order to save the translations of a language including all cached modifications for it into a file, make sure the respective language is selected (look e.g. at the header of the third table column) and then press the save button — it's the rightmost button of the toolbar, showing the usual floppy disk symbol. (You might have to enlarge the window to access it, cf the images above where only a section of it may be visible.) A file selection dialog will pop up and allow you to choose a target folder and — if wanted — a differing file name. If you happened to conduct modifications for several languages then each translation file must be saved separately. After having saved the changes, the associated language button colour will not return to the default button colour (usually some shade of gray) but turn pale green, indicating that all changes will stay cached:

This way, you may continue modifying the translations without having to begin from start. Any new modification will turn the button background to bright green again, of course.
How to load translation files
You may (re-)load saved translation files for a locale into Translator in order to resume with the result of a previous session. To do so hold the <Shift> button down while you click on the appropriate language button.

This will switch to the respective locale and open a file selection dialog allowing you to choose a translation file for the selected language from the file system. The translations found in this file will be loaded into Translator (for the selected language). All differences to the original locale will be highlighted as if they were just edited (see description above). The heading of the last (third) column (in every tab) will show the file path together with the locale name, e.g. "es (/usr/home/mickey/language_files/es1.txt)". If there had been unsaved changes for the selected locale before you clicked the button then Translator will first ask you whether you want to discard them (which is prerequisite for — or side-effect of — loading the file); by declining you cancel the loading action (nothing will happen). So if you'd rather save the changes you should cancel the overloading, save the pending changes and then try to load the file again.
Be aware that Translator does not check whether the loaded file actually belongs to the selected language or not. If not, then nearly all entries are likely to be marked as changes, of course. The button with the question mark, however, allows you to load translation file (labelled "extern (<filepath>)" then) whithout highlighting all fields as different. Only modifications after having loaded (or last saved) the file will be highlighted.
Note: New releases might change some message keys or slightly modify structure and hierarchy of the translation packages. So if you load a file originating from an earlier Structorizer version you may see several regions highlighted in red, i.e. as deletions, whereas some translations may not be displayed (though possibly being present in the file). If you know what you are doing, a manual modification of the keys in the text file according to the ones shown in Translator may help avoid losses. (But if it happens to be a lot of eclipsed new text then you may dare open an issue in the GitHub project and attach the outdated file, in order to let the development team sort it out — we know the mappings, of course.)
How to use an individual translation
Note also that saving a translation file does not mean that your local Structorizer installation would automatically use your modified translations from now on! You may force Structorizer to use a modified language file explicitly, however, by choosing the " From file ..." menu item in the language preferences menu: The path of the loaded file would even be kept in the structorizer.ini file and hence automatically reloaded on the next start — until you select another language. From file ..." menu item in the language preferences menu: The path of the loaded file would even be kept in the structorizer.ini file and hence automatically reloaded on the next start — until you select another language.
As already stated in the introduction, however, the Translator tool is chiefly meant to facilitate the maintenance and usability improvement of the Structorizer product. So the best you can do is to send an accomplished translation file in after having tested it by the preview tool) as requested under the IMPORTANT note in the header part of each translation file. (Don't forget to add a description of your changes to the Revision list section of the Header chapter.)
Last, but not least, you may create a translation file for a "new" idiom — meaning a language not having been provided so far by the language preferences. To do this, simply press the "?" button in the toolbar instead of one of the flag buttons. This way, you may start a completely new translation from scratch, i.e. with an empty third column. Just fill in the Header chapter appropriately, i.e. specify the language and yourself as author etc., and send the file in after completion. The Structorizer team will be grateful for your help.
Translator Row Editor (since version 3.29-11)
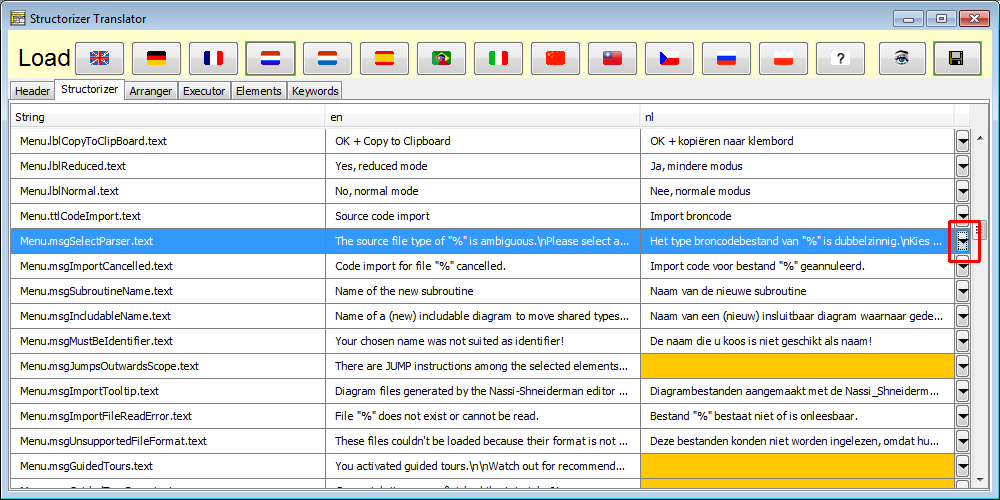
The button in the last table column (see screenshot above) opens a translation editor for the selected table row, showing the key (and possible conditions presented in a table for better readability), a text area with the English default text (from the second column), a text area with the translated text for the currently selected locale, and a third text area where the respective text of a selectable comparison locale can be presented.
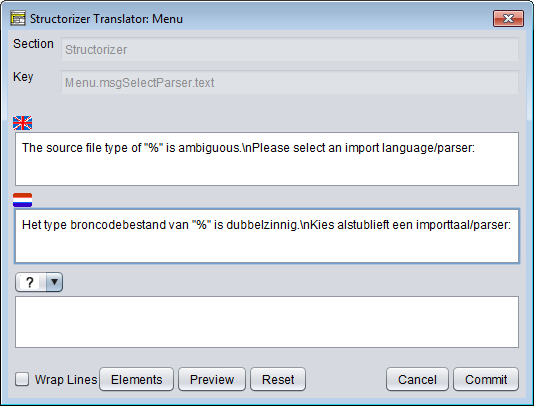
The checkox "Wrap Lines" allows you to switch between symbolic newlines (escape character sequence "\n") and real newlines:
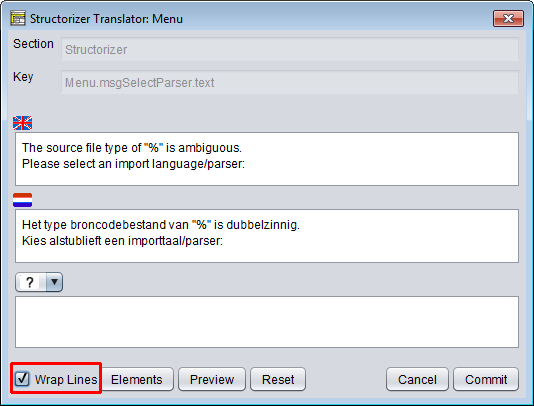
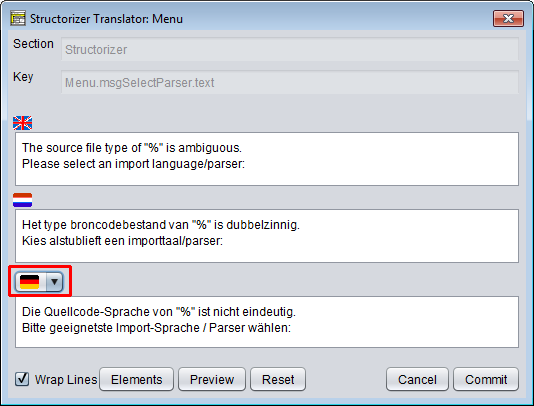
Via the pulldown choice element "?" between the second and the third text area you may select a third language for a reference translation:
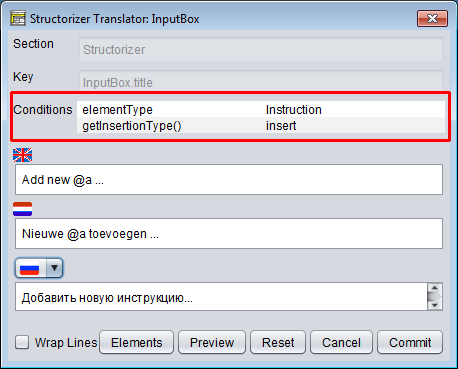
If you activate the row editor for a line with conditioned key then the conditions will be presented in a table at top:
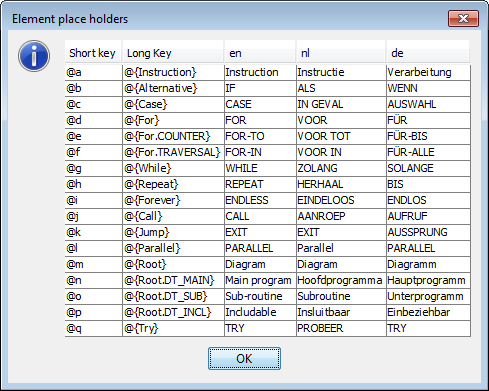
The "Elements" button pops up a window, which is listing the available element type name placeholders in short and long form as well as the corresponding translations in the default locale (English), your selected locale, and the most recent comparison locale (so you will not have to leave the row editor in order to look up the placeholders in the header tab):
By means of the "Preview" toggle button you may have the element type name placeholders in the currently presented texts replaced by the respective element name localizations until you press it again (deselect it). During preview mode, editing is not possible:
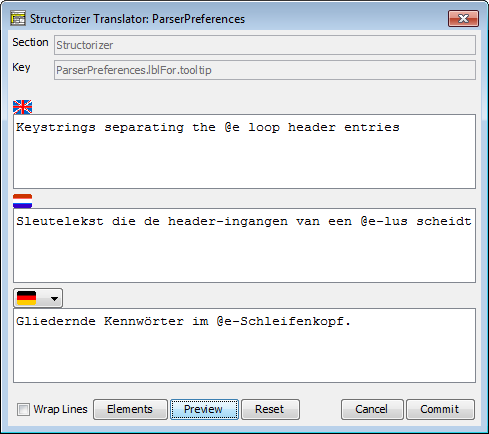
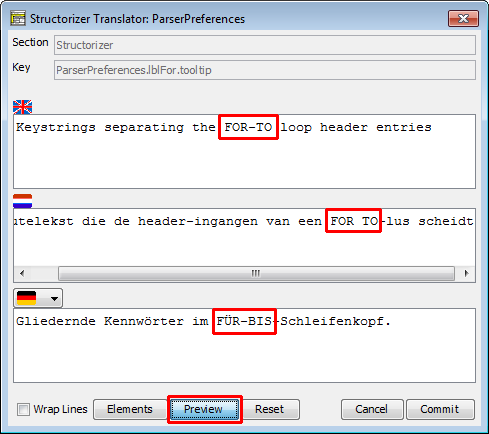
Undo/redo stacks haven't been implemented in the text area, but you may undo all current changes without leaving the dialog by pressing the "Reset" button. The same effect ist achieved by pressing the "Cancel" button but that it closes the dialog. Eventually, the "OK" button will commit your changes, copy the resulting translation into the related table row and close the dialog. |

